扩展知识
npm的使用
npm i 包名 –s –S –save –d 生产环境依赖
npm i 包名 –save-dev –D 开发环境依赖
- npm init 初始化 下载package.json 文件
- npm install 可简写 npm i 下载项目所有依赖包
- npm i 包名 下载某一个包
- npm i 包名@版本号 下载指定版本的包
- npm i 包名 -g 全局下载某一个包
- npm i 包名 –save-dev 局部安装
- npm list 不加-g 列举当前目录下的所有包,加-g列举全局…
- npm info 包名(详细信息) npm info 包名 version(获取最新版本)
- npm outdated 检查包是否已经过时
- npm uninstall -g 卸载全局包
- npm 卸载包具体参考 卸载包和依赖 - npm 中文文档 (nodejs.cn)
1
2
3
4
5
6
7
8
9
10
11
12
13
14
| 举例
"dependencies": {
"axios": "^0.18.1",
}
^ 表示 如果 直接npm i 将会 安装axios 0.*.* 最新版本 ^ 只能锁定版本号第一个数字
"dependencies": {
"axios": "~0.18.1",
}
~ 表示 如果 直接npm i 将会 安装axios 0.18.* 最新版本
"dependencies": {
"axios": "0.18.1",
}
* 表示 如果 直接npm i 将会 安装axios 最新版本
如果什么前缀什么都不加的话,就是指定版本的
|
包管理工具
全局安装 nrm npm i -g nrm
nrm -v 查看是否安装成功
NRM(npm registry manager)是npm 的镜像源管理工具,有时候国外资源太慢,使用这个就可以快速地在 npm 源之间切换
查询自己当前的镜像源:npm config get registry
手动切换方法: npm config set registry https://registry.npm.taobao.org
清除npm 缓存 npm cache clean –force
nrm 的使用方法 (命令)
1
2
3
4
| - nrm ls 查看可选的源。 其中,带* 的是当前正在使用的源,上面的输出表明当前源是官方源
- nrm use 源地址 表示切换当前源 例如:切换到淘宝源 , nrm use taobao
- nrm test 测试相应源的响应时间
|
yarn 的使用
对比npm:
速度超快:yarn 缓存了每个下载过的包,所以再次使用时无需重复下载。同时利用下载以最大化资源利用率,因此安装速度更快
超级安全:在执行代码之前,yarn 会通过算法校验每个安装包的完整性
- yarn init 初始化 下载package.json 文件
- yarn add 包名 添加包
- yarn add 包名@版本号 添加指定版本包
- yarn add 包名 –dev 安装到开发环境
- yarn upgrade 包名@版本号 将改包升级至指定版本
- yarn remove 包名 移除依赖包
- yarn install 可简写为:yarn 下载项目所有依赖包
扩展:
中国 NPM 镜像
这是一个完整的 npmjs.org 镜像,你可以永磁代替官方版本(只读),同步频率目前为10分钟一次以保证尽量与官方服务同步
1
| npm i -g cnpm --registry=https:
|
终端快捷键
上箭头: 定位到上一次使用的命令
tab: 快速补全文件路径
esc: 快速清空当前已输入的命令
cls: 清空终端
模块化
commonjs
commonjs 模块化:只要不导出就是私有的
导出一个
1
2
3
4
5
6
7
8
9
10
11
|
function test() {
console.log('test-a')
}
const a = require('./a')
console.log(a)
module.exports = test
|
导出多个
1
2
3
4
5
6
7
8
9
10
11
12
13
14
15
16
17
18
19
20
21
22
|
function test() {
console.log('test-a')
}
function uper(str) {
return str.substring(0, 1).toUpperCase() + str.substring(1)
}
module.exports = {
test,
uper
}
const a = require('./a')
console.log(a)
a.test()
console.log(a.uper('hello'))
|
导出多个(也可以这样写)
1
2
3
4
5
6
7
8
9
10
11
12
13
14
15
16
17
|
function test() {
console.log('test-a')
}
function uper(str) {
return str.substring(0 ,1).toUpperCase() + str.substring(1)
}
exports.test = test
exports.uper = uper
const a = require('./a')
console.log(a)
a.test()
console.log(a.uper('hello'))
|
ES6 模块化
ES6 模块化:js ES6语法新增
默认导出
1
2
3
4
5
6
7
8
9
10
11
|
const moduleA = {
}
export default moduleA
import moduleA from "./1"
console.log(moduleA)
|
// 运行 node 2.js 报错
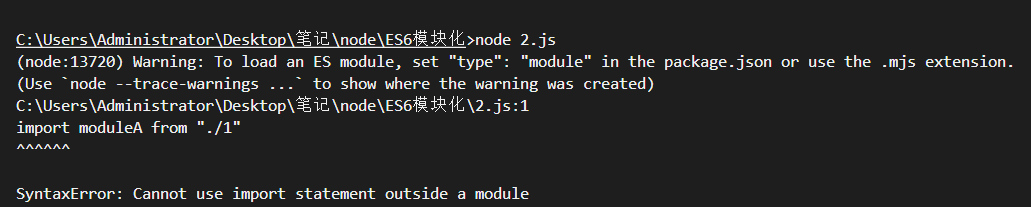
解决方法:
- 方法一:npm init 初始化下载package.json文件
1
2
3
4
5
6
7
8
9
10
11
12
13
| {
"name": "es-moduel",
"version": "1.0.0",
"description": "",
"main": "2.js",
"type": "module",
"scripts": {
"test": "echo \"Error: no test specified\" && exit 1"
},
"author": "",
"license": "ISC"
}
|
再次执行就成功了,输出: {}
1
2
3
4
5
6
7
8
9
10
11
12
13
|
const moduleA = {
getName(name) {
return name
}
}
export default moduleA
import moduleA from "./1.js"
console.log(moduleA.getName('node'))
|
按需导出
1
2
3
4
5
6
7
8
9
10
11
12
13
14
15
16
17
18
19
20
21
22
23
24
25
26
27
28
29
30
31
32
|
const obj = {
name:'张三',
age:25
}
function msg(params) {
return `${params.name}:${params.age}`
}
export {
obj,
msg
}
export const obj = {
name:'张三',
age:25
}
export function msg(params) {
return `${params.name}:${params.age}`
}
import {obj, msg as a} from './3.js'
console.log(obj)
console.log(a(obj))
|
注意:
export default 要导出的模块 默认导出一个文件只能默认导出一次
导入: import 变量名(名称符合规范即可) from ‘具体路径,可不带后缀’
epxort {模块一, 模块二} 按需导出将要导出的模块放在对象中,可一次导入多个,可以多次导出
导入:import {模块一, 模块二} from ‘路径’
按需导入是通过导出的对象模块解构的,名称需要和导入的模块一致,如果需要重命名,需以下写法
import {模块一 as 变量名} from ‘路径’
如果在package.json 里面设置了 type:module 那么就只能用 es模块化,也就是只能使用一种方式
ES6模块化,具有提升的效果,会提升到每个模块的头部
node.js 简介
node.js是一个基于Chrome v8引擎的JavaScript运行环境
node.js 运行环境 分为:
- v8引擎
- 内置API(fs,path,http,js内置对象,querystring, etc…)
注意:
终端:是方便程序员更好的操作电脑,辅助工具有 cmd 、powershell(相较于cmd功能更强大,更多)
脚手架目录详解
1
2
3
| - package.json 项目所有的依赖包
- package-lock.json
|
fs文件系统模块
fs模块 用来操作文件的模块 里面有一系列的方法和属性
**fs.readFile()**方法 用来读取文件中的内容
**fs.wrtieFile()**方法 向指定文件中写入内容
如果要在JavaScript代码中使用fs模块 要先来导入模块
const fs = require(‘fs’)
fs.readFile
fs.readFile(path, [options], callback)
被中括号([])包起来的是可选参数
其他的都是必选参数
参数解读
案例
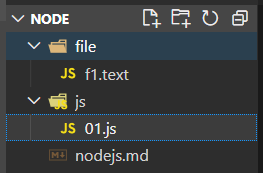
目录结构
1
2
3
4
5
6
7
8
9
10
11
12
13
14
15
| const fs = require('fs')
fs.readFile('../file/f1.text','utf8', function(err,res){
if(err){
return console.log('读取失败', err.message)
}
console.log('读取成功:', res)
})
|
fs.writeFile
fs.writeFile(path,data, [options], callback)
被中括号([])包起来的是可选参数
其他的都是必选参数
参数解读
覆盖
覆盖原有的内容
1
2
3
4
5
6
7
8
9
10
| const fs = require('fs')
fs.writeFile('../file/f2.text', 'writeFlie写入', 'utf8', function(err, res) {
if(err) return console.log('写入失败', err.message)
console.log('写入成功!')
})
|
添加
再原有的基础上拼接
1
2
3
4
5
6
7
8
| fs.readFile('../file/f2.text','utf-8', function(err,res) {
if(err) return console.log(读取失败)
console.log(res)
fs.writeFile('../file/f2.text', res + 'writeFlie写入', 'utf8', function(err, res) {
if(err) return console.log('写入失败', err.message)
console.log('写入成功!')
})
})
|
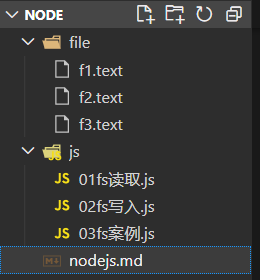
案例
目录结构
1
2
3
4
5
6
7
8
9
10
11
12
13
14
15
16
17
18
19
20
|
const fs = require('fs')
fs.readFile('../file/f3.text', 'utf8', function(err, res){
if(err) return console.log('读取失败!')
console.log('读取成功!')
const arr = res.split(' ')
console.log(arr)
const newarr = []
arr.forEach(item => newarr.push(item.replace('=' , ':')))
const newstr = newarr.join('\r\n')
fs.writeFile('../file/f3.text',newstr, function(err2, res2){
if(err2) return console.log('写入失败!')
})
console.log('写入成功!')
})
|
fs 模块 - 路径动态拼接的问题
目录结构
1
2
3
4
5
6
7
8
|
const fs = require('fs')
fs.readFile('../file/f1.text', 'utf8',function(err, res){
if(err){
  return console.log('读取失败', err.message)
}
console.log('读取成功:', res)
})
|

在 node 文件夹下面执行 node js\01fs读取.js 报错 cd js 再执行 node js\01fs读取.js不会报错
1
2
3
4
5
6
7
8
9
|
const fs = require('fs')
fs.readFile('file/f1.text', 'utf8', function(err, res){
if(err){
return console.log('读取失败', err.message)
}
console.log('读取成功:', res)
})
|

在使用 fs 模块操作文件时,如果提供的操作路径是以 ./ 或 ../ 开头的相对路径时,很容易出现路径动态拼接错误的问题
原因:代码在运行的时候,会已执行 node 命令时所处的目录,动态拼接出被操作文件的完整路径
解决方案:
- 使用绝对路径 鼠标反键复制路径 C:\Users\Administrator\Desktop\笔记\node\file\f1.text (移植性非常差、不利于维护)
- ——dirname 当前目录拼接
- 或者cd到要执行文件路径下 node js文件名
斜杠转义: C:\Users\Administrator\Desktop\笔记\node\file\f1.text
代码
1
2
3
4
5
6
7
8
| const fs = require('fs')
fs.readFile('C:\\Users\\Administrator\\Desktop\\笔记\\node\\file\\f1.text', 'utf8', function(err,res){
if(err){
return console.log('读取失败', err.message)
}
console.log('读取成功:', res)
})
|

__dirname : 表示当前文件所处的目录
1
2
3
4
5
|
fs.readFile(__dirname + '/../file/f1.text', 'utf-8', function(e, data) {
  if(e)  return console.log('读取失败', e.message)
  console.log('读取成功!')
})
|

path 路径模块
路径拼接 path.join()
导入: const path = require(‘path’)
path.join() 的语法格式
使用 path.join() 方法,可以把多个路径片段拼接为完整路径字符串,语法格式如下
参数解读
代码示例:
1
2
3
4
5
6
7
8
9
10
11
12
13
14
15
16
17
18
19
20
21
22
23
24
| const path = require('path')
const pathstr = path.join('/a', '//b/c', '../', './d', '/e')
console.log(pathstr)
const fs = require('fs')
fs.readFile(__dirname + '/../file/f1.text', 'utf-8', function(err, res) {
console.log(res)
})
fs.readFile(path.join(__dirname , '../file/f1.text'),"utf-8",(err2, res2)=>{
console.log(res2)
} )
|
获取路径中的文件名
path.basename() 的代码示例
使用 path.basename方法(),可以从一个文件路径中,获取到文件的名称部分
1
2
3
4
5
6
7
8
9
10
11
12
| const path = require('path')
const pathstr = '/node/public/index.html'
const name = path.basename(pathstr)
console.log(name)
const name2 = path.basename(pathstr, '.html')
console.log(name2)
|
获取路径中的文件扩展名
path.extname() 的代码示例
使用 path.extname() 方法,可以获取路径中的扩展名部分
1
2
3
4
5
6
7
| const path = require('path')
const str = 'src/view/index.vue'
const fext = path.extname(str)
console.log(fext)
|
url 模块
node 自动执行代码(当代码保存后)
npm i -g nodemon 全局安装
nodemon -v 查看版本
或 npm i -g node-dev 执行命令 node-dev 文件名
url.parse(路径) 方法
1
2
3
4
5
6
7
8
9
10
11
12
13
14
15
16
17
18
19
20
21
22
23
| const http = require('http')
const url = require('url')
const { renderHtml, renderStates } = require('./functions')
http.createServer((req, res)=>{
if(req.url === '/favicon.ico') return
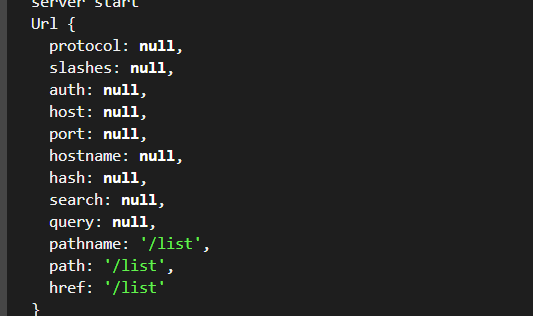
const urlobj = url.parse(req.url, true)
console.log(urlobj)
const path = urlobj.pathname
console.log(path)
res.writeHead(renderStates(path), { "Content-Type":"text/html; Charset=utf-8" })
res.write(renderHtml(path))
res.end()
}).listen(3000, ()=> {
console.log('server start')
})
|
旧版方法
了解即可
format ()已废弃
1
2
3
4
5
6
7
8
9
10
11
12
13
14
15
16
17
18
19
20
21
| const url = require('url')
const urlString = 'https://www.baidu.com:443/ad/index.html?id=8&name=mouse#tag=110'
const parseStr = url.parse(urlString)
console.log(parseStr)
const parseObj = url.format(parseStr)
console.log(parseObj)
|
1
2
3
4
5
6
7
8
9
10
11
| const url = require('url')
const a = url.resolve('/one/two/three', 'four')
const b = url.resolve('/one/two/three/', 'four')
const str = url.resolve('http://example.com/a/c', '/one')
console.log(str)
console.log(a, b)
|
新版方法
1
2
3
4
5
6
7
8
9
10
11
12
13
14
15
16
17
18
19
20
21
22
23
24
25
26
27
|
const http = require('http')
const { renderHtml, renderStates } = require('./functions')
http.createServer((req, res)=>{
if(req.url === '/favicon.ico') return
const url = new URL(req.url, 'http://localhost:3000')
console.log(url)
console.log(url.searchParams.get('a'))
console.log(url.searchParams)
for(let [key, value] of url.searchParams){
console.log(key, value)
}
const path = url.pathname
res.writeHead(renderStates(path), { "Content-Type":"text/html; Charset=utf-8" })
res.write(renderHtml(path))
res.end()
}).listen(3000, ()=> {
console.log('server start')
})
|
1
2
3
4
5
6
7
8
9
10
11
12
13
14
15
16
17
18
| const str = new URL('/one', 'http://example.com/a/c')
console.log(str, str.href)
|
queryString 模块
parse
1
2
3
4
5
6
7
8
9
10
11
| const str = 'name=张三&age=25&sex=男'
const query = require('querystring')
const {
name,
age,
sex
} = query.parse(str)
console.log(name, age, sex)
|
stringify
1
2
3
4
5
6
7
8
| const query = require('querystring')
const person = {
name:'李四',
sex:'女',
age:18
}
const newstr = query.stringify(person)
console.log(newstr)
|
escaped/unescaped
字符转义
1
2
3
4
5
6
7
8
9
| const query = require('querystring')
const str = 'id=3&city=北京&url=https://www.baidu.com'
const escaped = query.escape(str)
console.log(escaped)
const unescaped = query.unescape(escaped)
console.log(unescaped)
|
http 模块
基础语法
1
2
3
4
5
6
7
8
9
10
11
12
13
14
15
|
const http = require('http')
const server = http.createServer((req, res)=>{
res.write('111')
res.end()
})
server.listen(3000, ()=>{
console.log('server服务器已开启')
})
|
1
2
3
4
5
6
7
8
|
const http = require('http')
http.createServer((req, res)=>{
res.write('111')
res.end()
}).listen(3000, ()=>{
console.log('server服务器已开启')
})
|
返回html
1
2
3
4
5
6
7
8
9
10
11
12
13
| const http = require('http')
const server = http.createServer((req, res)=>{
res.write(`<html>
<h1>你好 nodejs</h1>
</html>`)
res.end()}).listen(3000, ()=> {
console.log('server start')
})
|
res.writeHead(200, { "Content-Type":"text/html; charset=utf-8" }) 在res.end() 之前发送
- text/html 当作html 来解析
- text/plain 当作字符串来解析 res 返回什么网页就展示什么
- charset=utf-8 字符集 表示可以显示中文
案例
通过不同路径显示不同内容
1
2
3
4
5
6
7
8
9
10
11
12
13
14
15
16
17
18
19
20
21
22
23
24
25
26
27
28
29
30
31
32
33
34
35
| const http = require('http')
http.createServer((req, res)=>{
if(req.url === '/favicon.ico') return
console.log(req.url)
res.writeHead(renderStates(req.url), { "Content-Type":"text/html; Charset=utf-8" })
res.write(renderHtml(req.url))
res.end()
}).listen(3000, ()=> {
console.log('server start')
})
function renderHtml(url) {
switch(url) {
case '/list':
return `<html>
<h1>你好 nodejs</h1>
</html>`
case '/home':
return `<html>
<h1>home</h1>
</html>`
default:
return `<html>
<h1>404</h1>
</html>`
}
}
function renderStates(url) {
const path = ['/home', '/list']
return path.includes(url) ? 200 : 404
}
|
改写
1
2
3
4
5
6
7
8
9
10
11
12
13
14
15
16
17
18
19
20
21
22
23
24
25
26
27
28
29
30
31
32
33
34
35
36
37
38
39
40
41
42
43
44
45
46
47
48
|
const http = require('http')
const {renderHtml, renderStates} = require('./functions')
http.createServer((req, res)=>{
if(req.url === '/favicon.ico') return
console.log(req.url)
res.writeHead(renderStates(req.url), { "Content-Type":"text/html; Charset=utf-8" })
res.write(renderHtml(req.url))
res.end()
}).listen(3000, ()=> {
console.log('server start')
})
function renderHtml(url) {
switch(url) {
case '/list':
return `<html>
<h1>你好 nodejs</h1>
</html>`
case '/home':
return `<html>
<h1>home</h1>
</html>`
case '/api':
return `
['list1', 'list2', 'list3']
`
default:
return `<html>
<h1>404</h1>
</html>`
}
}
function renderStates(url) {
const path = ['/home', '/list', '/api']
return path.includes(url) ? 200 : 404
}
module.exports = {
renderHtml,
renderStates
}
|
// 其他写法
1
2
3
4
5
6
7
8
9
10
11
12
13
14
15
| const http = require('http')
const server = http.createServer()
server.on('request', (request, res)=>{
res.writeHead(200, { 'Content-Type':'application/json' })
res.end(JSON.stringify({
data:'Hello World!'
}))
})
server.listen(8000, ()=>{
console.log('server start')
})
|
http 扩展模块-json
1
2
3
4
5
6
7
8
9
10
11
12
13
14
15
16
| const http = require('http')
const url = require('url')
http.createServer((req, res)=>{
res.writeHead(200, { 'Content-Type':'text/html; Charset=utf-8' })
const myurl = url.parse(req.url)
switch(myurl.pathname){
case '/api/aaa':
res.end(`start(${JSON.stringify({
name:'张三',
age:25
})})`)
default :
res.end('404')
}
}).listen(3000)
|
1
2
3
4
5
6
7
8
9
10
11
12
13
14
15
16
17
18
19
20
21
| <!DOCTYPE html>
<html lang="en">
<head>
<meta charset="UTF-8">
<meta http-equiv="X-UA-Compatible" content="IE=edge">
<meta name="viewport" content="width=device-width, initial-scale=1.0">
<title>Document</title>
</head>
<body>
<script>
const oscript = document.createElement('script')
oscript.src = 'http://localhost:3000/api/aaa'
document.body.appendChild(oscript)
function start(url){
console.log(url)
}
</script>
</body>
</html>
|
1
2
3
4
5
6
7
8
9
10
11
12
13
14
15
16
17
| const http = require('http')
const url = require('url')
http.createServer((req, res)=>{
res.writeHead(200, { 'Content-Type':'text/html; Charset=utf-8' })
const myurl = url.parse(req.url, true)
console.log(myurl.query.callback)
switch(myurl.pathname){
case '/api/aaa':
res.end(`${myurl.query.callback}(${JSON.stringify({
name:'张三',
age:25
})})`)
default :
res.end('404')
}
}).listen(3000)
|
1
2
3
4
5
6
7
8
9
10
11
12
13
14
15
16
17
18
19
20
21
| <!DOCTYPE html>
<html lang="en">
<head>
<meta charset="UTF-8">
<meta http-equiv="X-UA-Compatible" content="IE=edge">
<meta name="viewport" content="width=device-width, initial-scale=1.0">
<title>Document</title>
</head>
<body>
<script>
const oscript = document.createElement('script')
oscript.src = 'http://localhost:3000/api/aaa?callback=test'
document.body.appendChild(oscript)
function test(url){
console.log(url)
}
</script>
</body>
</html>
|
http 扩展模块-cors
https://github.com/qiufeihong2018/answer_of_interview_questions/blob/master/images/personal-blog-ui.jpg?raw=true
http 模块-get
http 模块-post
express
快速搭建express项目
首先确保你已经在本地安装了 Node.js 和 npm
打开终端并创建一个新的文件夹,例如 my-express-app,然后在该文件夹中打开终端
运行以下命令来初始化一个新的 npm 项目:
按照提示填写项目的基本信息,例如项目名称、描述、作者等信息。在完成后会生成一个 package.json 文件,并保存在项目的根目录中
安装 Express
这样就会在项目中安装 Express 包
创建 index.js 文件作为项目入口文件,并添加以下内容:
1
2
3
4
5
6
7
8
9
10
| const express = require('express')
const app = express()
app.get('/', (req, res) => {
res.send('Hello world!')
})
app.listen(3000, () => {
console.log('Server is running on port 3000')
})
|
这个文件创建了一个使用 Express 的应用程序,并定义了一个处理 / 路径请求的路由。该路由返回一个 “Hello world!” 的响应。最后,应用程序被绑定到本地的 3000 端口,并使用 console.log() 打印出服务器已经启动的消息
运行该应用程序:
这样应用程序就会运行,并可以通过访问 http://localhost:3000 来访问你的应用